
What would a trip to Walt Disney World be without the My Disney Experience App? Well, it would be a lot simpler, that’s for sure.
By now, you’ve probably heard plenty about the App at Walt Disney World. But, when you’re new to Walt Disney World planning, it can be confusing and completely overwhelming.
There’s a lot going on in the My Disney Experience App. But, these are the things you should use be using My Disney Experience for – both in planning and while you’re on vacation.

What is My Disney Experience?
My Disney Experience is an all-in-one tool used by Walt Disney World. While Disneyland’s system is similar, they does not use this system.
Not only does it hold all of your vacation plans, you can use the app to pay for food and souvenirs, access photos, room charges, and more.
There are 2 ways that you can access My Disney Experience. You can download their free app from your phone’s App Store. But, you can also access the information at MyDisneyExperience.com.
If it looks familiar, it’s because it’s actually on Walt Disney World’s website.
Disney uses the same login for all of their sites, including shopDisney and Disney+. So, if you have an account on any of these sites, you already have access to My Disney Experience.

Disney Parks Planning
Whether you booked on your own or you used a Travel Agent, the first thing you should do is to make sure everything is on your account and it linked up correctly.
Can you see the name of everyone in your traveling party? Is the right Resort showing up? Does everyone have the right tickets? These are things you should be looking at.
While it’s an easy fix, it does require a call to Disney. And without getting it fixed, it could affect your ability to continue your planning process.
Why does it matter if it’s on My Disney Experience?
Having all the details in your account is now essential to planning other parts of your vacation. Although you know that you have a Resort Reservation and/or Park Tickets, the App may not know that.
Linking everything as soon as possible means gaining access to all of the essential tools you’ll need to plan your vacation. And it’s one less thing you have to worry about later.
Family and Friends List
In order to make plans, and eventually book Lightning Lanes and/or Virtual Queue, you’ll need to make sure everyone is on your My Family and Friends list.
If they’re staying in your room, they should link automatically. But, if they’re not, you can follow the prompts under Add a Guest.
Park Reservations
Once you made sure your tickets are linked and everyone traveling with you is attached to your account, it’s time to book your Park Reservations. This is important!
Even if you have tickets, this is not enough to get you into the Parks. You need to have Park Reservations for that Park. This is why I always suggest you take a look at the Park Reservation Availability site before deciding to book.
While we don’t know how long they will be required, what we do know is that this is an important step that can not be skipped.
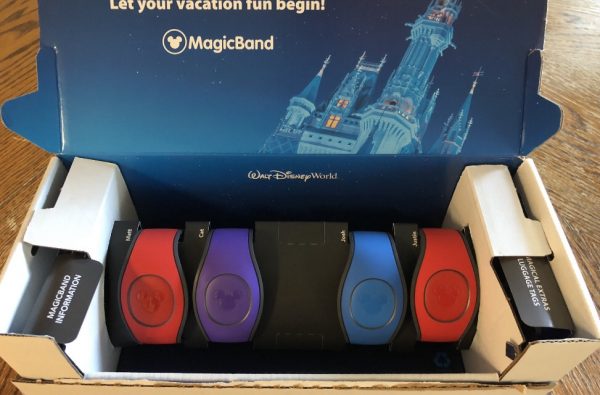
MagicBands
The next step is to purchase your MagicBands (if you plan on using them).
If you’re not sure what they are, or you’re not sure if need one, you should read Everything You Need To Know About MagicBands before buying them.
If you’re staying at a Walt Disney World Resort, you do get a discount on MagicBands, through My Disney Experience. This includes the brand new MagicBand+.
And additional benefit of going through My Disney Experience is that they will already be linked to your account when you receive them in the mail. So, that’s one less thing to do.
If you’re staying off property, or you simply want a different design, you will need to link them yourself prior to going to the Parks. Simply type in the code on the back of your MagicBand (MagicBand 1 and 2) or hold your MagicBand+ up to your phone to sync.
Once completed, everything on your My Disney Experience account automatically connects to your MagicBand.

60 Day Reservations
Once you hit your 60-day mark, it’s time to start booking your Reservations. This includes Dining, Bibbidi Bobbidi Boutique, Savi’s Workshop, Harmony Barber Shop, and more.
Booking Reservations require a credit card. But, they will not charge that card, unless it’s specifically mentioned at the time of booking.
Reservations are hard to come by in Walt Disney World. So, they want to make sure you show up. In the event you miss your Reservation, they will charge a no-show fee of $10 (per person) to that card.
You can make, change, and cancel Reservations right on your phone. The App even adds those Reservations to your Itinerary, so you’ll always know what you booked.
Online Check-In
You can also start the online check-in process starting 60 days prior to the day your arrive to your Resort. Don’t want to stand in line after getting off a hot plane? Can’t wait to go to the Parks? Online check-in allows you to completely skip the Front Desk and go straight to your room (or the Parks).
Once you answer all of their questions, you (should) receive an email and/or text when your room is ready on check-in day.
Just an FYI: This part can be a little hit or miss. Sometimes, it works perfectly and we get notified by text/email. Other times, we never get notified, despite our room being ready.
If that happens, simply check My Disney Experience. If your room is ready, the room number will be on your Itinerary.

At Walt Disney World
Yay! You finally made it to Walt Disney World! Despite what you may think, your work on the My Disney Experience App is just getting started.

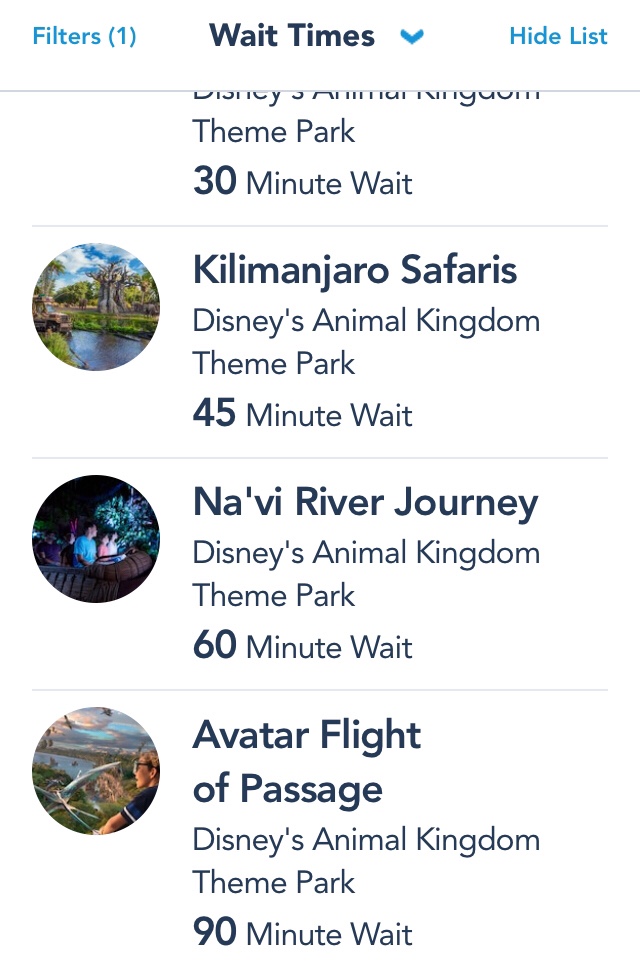
Wait Times
One of the most used function of the App is Wait times. It’ll be the 2nd icon, on the bottom of your screen.
Most often, it’ll default to Magic Kingdom. But, by using the filter, you can see the wait times of the other Parks.
If you’d rather see a list, rather than a map, the Show List tab is on the top right hand side of your screen.
Since this is essentially a map of Walt Disney World, you can use this feature for more than finding out how long the lines are at attractions.
No matter how many times I go to Disney Springs, I always manage to lost. I can’t tell you why. I guess I’m just terrible with directions. But, to give the illusion that I know where I’m going, I filter to Disney Springs and use the map to find where I’m going.

Mobile Order
Mobile Order is, hands down, one of my favorite additions to the app. Why wait in line to get food when order your food from your phone and pick it up as soon as you’re ready?
Seriously, if you’re not already using Mobile Order, you should!
The only caveat to Mobile Order is that some limited-time specialty treats are not going to be listed on the App. And if you have special dietary restrictions, you’re better off standing in line to speak to a Cast Member.
I have noticed improvement in this feature over the past few trips. But, it still has areas that can be improved.

Genie+
Oh boy…Genie+. Where do I even begin with this one.
First of all, if you don’t know what Disney Genie and Disney Genie+ are, please read Everything You Need To Know About The New Disney Genie before thinking of purchasing it.
You don’t want to pay $15 per person, if you have no intention of using the My Disney Experience App to book attractions. Despite what others say, I do see improvements being made to make sure it’s worth your money.
If you remember nothing else about this App, remember this. If you learn how to use Genie+ before you get to the Parks, it can absolutely be a timesaver. We bypassed a 95 minute line for Remy’s Ratatouille Adventure, and even purchased an Individual Lightning Lane to walk onto Flight of Passage when the line was 2 hours long.
However, a downside to this is you’re going to be on your phone…a lot.
Virtual Queue
Even if you don’t purchase Genie+, you can still book a Virtual Queue through the unpaid portion of Disney Genie.
Because it’s free, it will fill up the fastest. So, I do recommend booking these before booking attractions on Genie+.
At the time of writing, the only attraction that currently uses a Virtual Queue is Guardians of the Galaxy: Cosmic Rewind, in Epcot.
There are only 2 ways to ride attractions with Virtual Queues. You can either get a free Reservation (AKA Virtual Queue), or you can pay for the Individual Lightning Lane. There is no standby line.
Get up before 7AM and book this one because you’re not going to want to miss this attraction. It’s truly amazing.
Your Passport to FREE Travel Resources – Unlock Now!
Sign up to gain access to The Traveler’s Toolbox. Discover sample itineraries, expert tips, fun pages, and more.
PhotoPass (Memory Maker)
Vacations at Walt Disney World is something I want to remember forever. So, of course, I want pictures. That’s why I purchase Memory maker for all of my trips.
There are PhotoPass photographers scattered throughout Disney Property. One they take your picture, they’ll scan your MagicBand or Magic Maker card.
And, of course, those pictures will show up on My Disney Experience.
Even if you didn’t purchase the Photo package, you will be able to see the pictures. However, you will have a watermark plastered across it, so you can’t download it.
If you want to save $30, purchase it ahead of time. Currently, Memory Maker is $169, or $199 if you purchase it after you get to Walt Disney World. And you get unlimited photos, including Magic Shots and on-ride photos.
If you only want a couple photos, you can purchase individual pictures. But, they’re pretty pricey at about $17 per photo. So, you may be better off purchasing the whole package.
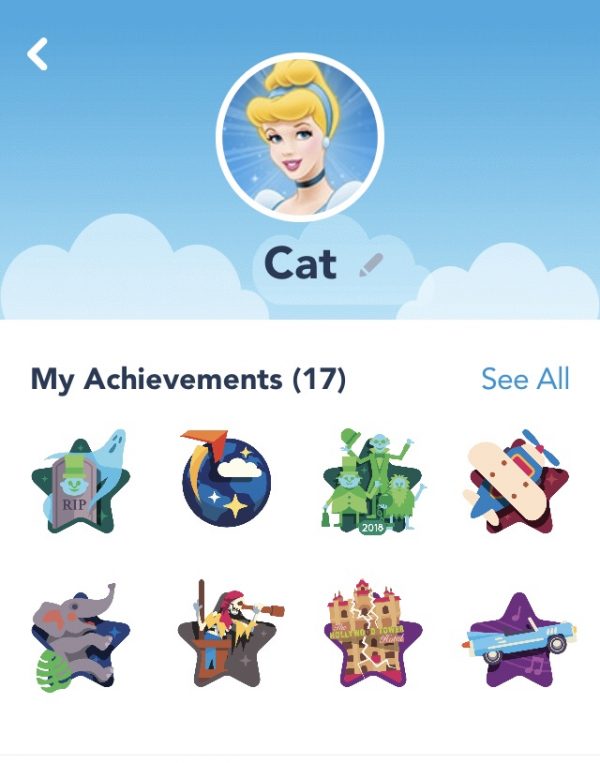
Play Disney Parks
Even if you purchase Genie+, at some point, you’re going to be waiting for something. So, you may as well play some games to pass the time.
Along with trivia games, you can learn facts, listen to music, and earn achievements for going to different Attractions.
If you have MagicBand+, there’s a Batuu’s Bounty Hunters game, in Hollywood Studios’ Star Wars: Galaxy’s Edge, that interacts with your MagicBand+.
Bring a backup charger with you. You’re going to need it.

Shopping
If there’s anything more annoying than standing in line for food, it’s standing in a long line to pay for merch.
Before you tart questioning if you really need that souvenir, open the App and scan the price tag. It will add the item to your cart. You can use a Credit Card or a Gift Card to pay for your items.
If you’re like me and only use Gift Cards at Walt Disney World to stay on budget, I did notice that the system does not save Gift Cards to your account. Since I combine Gift Cards onto one Card, it would have been nice to not have to keep entering it at checkout.
But, other than that, the process is simple. You’ll be given a code, which you show a Cast Member near the door. They’ll scan your code and offer to give you a bag, if you need one.
At The Resorts

Bus Waits
When this addition was added to the My Disney Experience App, I was probably more happy than I should have been.
Waiting for the bus at a Resort can really test a person’s patience. Time doesn’t move any slower than it does when you’re ready to head to the Parks.
The system runs in real-time, so I always know when the next bus will be making its return trip.

Unlock your Resort Door
This does not replace your Magic Band. But, it does work in addition to it.
It’s still much faster to just tap your MagicBand. But, if you forget your MagicBand in the room, you have another way to unlock your door.
Since most of us remembers to bring our phone with us, it’s great that there’s a backup. Simply open the app and press “unlock door” as you place your phone close to the sensor.
It really is that simple…
Check on Room Charges
Disney makes it way too easy to pay for things using your MagicBand. If you’re not careful, you can rack up a pretty hefty bill. Fortunately, you can check your room charges at any point.
While I do only use Gift Cards at Walt Disney World, I make it a point to check my room account, just in case my husband or kids decided to be sneaky and charge with their MagicBand (AKA a room charge).
We do use the same Pin for all of us. So, it wouldn’t be hard for them to charge the room. But, if you don’t want your kids to have access to this capability, you can change their Pin to something they don’t know.
Haven’t downloaded the App yet? Here’s where you can find it!
My Disney Experience for Apple
My Disney Experience for Android

Got questions? Feeling a bit anxious? Not sure where to begin? We help families, just like yours.
Planning an entire vacation can be overwhelming. But, here’s the good news: we have the answers to the questions that have been stopping you from pulling the plug on your next vacation.
We understand the journey, the ups, and the downs. We’ve been through the training, made our fair share of mistakes, and learned valuable lessons from them. This is what makes us the perfect people to assist you.
From thoughtfully crafted itineraries to having direct access to your dedicated Travel Professional, our mission is to remove the stress from your vacation planning. With our simple 3-step process, we’re here to help you every step of the way, ensuring that your dream destination becomes an unforgettable reality.
This post features affiliate links. When you make a purchase through these links, we may earn a modest commission. Rest assured, this does not result in any extra cost for you, and we do not gain access to your personal information. These commissions, though small, play a significant role in supporting our business. We genuinely appreciate your support—THANK YOU!


39 Comments
Is It Possible To Plan A Magical Walt Disney World Vacation Last Minute? - Disney Solution
September 14, 2018 at 10:06 am[…] checking My Disney Experience! Guests are always changing their minds, making popular fastpasses and Dining Reservations […]
Apps You Should Have On Your Phone For Your Next Disney Vacation - Disney Solution
September 18, 2018 at 8:09 am[…] My Disney Experience / Disneyland App […]
Testing New Features On The My Disney Experience App - Disney Solution
October 4, 2018 at 11:48 am[…] previously shared a few new features that can now be found on the My Disney Experience App, but until now, we haven’t been able to try them out firsthand. Well, that all changed this […]
Apps You Should Have On Your Phone Before Your Disney Vacation - Disney Solution
October 4, 2018 at 9:39 pm[…] My Disney Experience / Disneyland App […]
Toy Story Land - An Honest Review - Disney Solution
October 9, 2018 at 7:52 am[…] during the lunch rush. But, this also gave me the opportunity to try out the Mobile Ordering on the My Disney Experience App, since Woody’s Lunch Box is a participating […]
Gift Giving Guide: Gifts To Give Someone Going On A Disney Vacation - Disney Solution
November 24, 2018 at 2:40 pm[…] can easily be linked to your reservation or tickets on My Disney Experience. And now Shop Disney has Magickeepers Lanyard Metals for those who do not like to use a Magic […]
Memory Maker: Should you buy it? - Disney Solution
December 3, 2018 at 10:02 am[…] well, but you are not required to purchase them later on. If anything, you can just look at them on My Disney Experience (with a watermark over […]
Bypass The Front Desk And Check-In Online - Disney Solution
January 14, 2019 at 9:37 pm[…] guests felt the same way, which is why Disney listened. With the addition of Online Check-in, on My Disney Experience, you can go right to your Hotel Room and bypass the Check-in line […]
Mickey & Minnie's Surprise Celebration In Magic Kingdom | Disney Solution
January 27, 2019 at 1:55 pm[…] Need help finding this location? You can find a map of Magic Kingdom, directions to Town Square Theater, and the current wait time on the My Disney Experience App. […]
Pizzafari – Family Style Dining Review | Disney Solution
February 3, 2019 at 12:38 am[…] limit the amount of time I would be opening My Disney Experience, I had addedd all of my Fastpasses and Dining Reservations to my calendar on my phone and Apple […]
Mobile Order Update To Make Ordering Easier At Disneyland and Walt Disney World | Disney Solution
February 13, 2019 at 2:26 pm[…] you want to see our review of Mobile Order, and other features found on the My Disney Experience App, be sure to check out Testing Out New Features on the My Disney Experience […]
Places You'll Find Mickey And Minnie Meet and Greets Together In Walt Disney World | Disney Solution
April 6, 2019 at 12:58 pm[…] You can also find directions on the My Disney Experience App. […]
Skip The Front Desk And Check-In To Your Resort Online | Disney Solution
July 21, 2019 at 10:37 pm[…] Your Reservation number (linked to My Disney Experience) […]
Hilton Orlando Bonnet Creek and Waldorf Astoria Orlando Become Official Walt Disney World Hotels
February 10, 2020 at 11:19 pm[…] Band in the Parks, which I highly suggest, one can be purchased on Shop Disney and linked to your My Disney Experience […]
Everything You Need To Know About The Disney Dining Plan | Explore With Catherine
March 30, 2020 at 2:00 pm[…] for this reason, I always recommend looking at Disney’s Website and My Disney Experience before leaving your […]
Disney Vacation Themed Easter Egg Fillers | Explore With Catherine
April 8, 2020 at 6:33 pm[…] new MagicBands onto My Disney Experience is easy. Just enter the code on the inside of the MagicBand and everything links to it […]
We Used 2 Recipes To Make Dole Whip. Which Tastes Better? | Explore With Catherine
April 19, 2020 at 7:00 am[…] tell me I’m not the only one that gets giddy when you see a notification pop up from the My Disney Experience and/or the Disneyland […]
Disney Vacation Planning For Beginners - Part 2 | Explore With Catherine
April 20, 2020 at 7:31 pm[…] MagicBand at the end of a ride. PhotoPass photograhers will also add the photo he/she took to your My Disney Experience Account by tapping your MagicBand to a device attached to their […]
MagicBands - What Are They? and other FAQ | Explore With Catherine
April 30, 2020 at 11:08 pm[…] everything is linked through My Disney Experience, if you lose your MagicBand, you can easily deactivate it. This way, no one can even accidentally […]
How To Sign Your Child Up for Jedi Training: Trials of the Temple | Explore With Catherine
May 3, 2020 at 3:07 pm[…] photographer will pass out a small card with a code on it to the parents. Enter the code into your My Disney Experience account and the photos will appear on your […]
Walt Disney World Park Reservation Details Released | Explore With Catherine
June 19, 2020 at 9:18 pm[…] If you’ve ever made Dining or Fastpass Reservations, you should have no problem booking your Park days since they all work through My Disney Experience. […]
Walt Disney World Reopening: What To Expect Before Returning | Explore With Catherine
June 22, 2020 at 7:25 am[…] This is something that is brand new! Beginning June 22, 2020, you will be able to chat with a Resort Cast Member via the My Disney Experience app. […]
What Happens When You Get Sick At Disney World? | Explore With Catherine
August 1, 2020 at 2:48 pm[…] of the closest First Aid location in the Theme Parks and Water Parks, you can find maps on the My Disney Experience App or Disney’s […]
The Benefits of Doing Online Check-In Ahead of Time
August 6, 2020 at 4:41 pm[…] check-in can be done either on the My Disney Experience App or on the […]
Is It Possible To Plan A Magical Walt Disney World Vacation Last Minute?
August 29, 2020 at 6:08 pm[…] checking My Disney Experience! Guests are always changing their minds, making popular fastpasses and Dining Reservations […]
How Planning A 2021 Walt Disney World Vacation Will Be Different | Explore With Catherine
January 1, 2021 at 12:56 pm[…] with limited capacity. And now that Guests are able to add themselves to a waitlist through the My Disney Experience app, getting some of those Table Service Reservations aren’t as easy as you […]
New Character MagicBands For Walt Disney World Packages
January 17, 2021 at 9:11 pm[…] your Package is booked, log into My Disney Experience and choose the color you’d […]
Everything You Need To Know About The New Disney Genie - Explore With Catherine
November 10, 2021 at 2:25 pm[…] Disney Genie will work with your existing My Disney Experience and Disneyland Apps. Much like Walt Disney World’s brand new Disney MagicMobile, updating the App […]
What A Travel Agent Doesn't Tell You (But Probably Should) -
August 12, 2022 at 10:14 pm[…] And even then, there are things they can’t discuss with us, including certain details on your My Disney Experience […]
Disney and Universal In One Trip? How Does It Work? -
December 28, 2022 at 10:30 am[…] Admittedly, it’s a lot harder to plan a Disney vacation. So, where you buy Disney tickets has a lot to do with how knowledgeable you are with My Disney Experience. […]
What A Travel Agent Doesn't Tell You (But Probably Should) -
January 28, 2023 at 8:57 pm[…] I can make sure your package is the best option for your family, apply discounts, and set up your My Disney Experience account so you’re all set for your […]
Avoid These Common Walt Disney World Mistakes -
February 11, 2023 at 12:32 pm[…] That’s why I always recommend using Mobile Order, on the My Disney Experience App. […]
Tips For Getting The Most Popular Dining Reservations At Walt Disney World -
March 9, 2023 at 6:58 am[…] you can, book through the My Disney Experience App. If you have a credit card saved to your account, you can use that card to book your reservations. […]
4 Easy To Remember Tips For Genie+ - Explore With Catherine
August 22, 2023 at 10:23 am[…] attractions has a regular Lighting Lane and which has an Individual Lighting Lane. If you open up My Disney Experience, Individual Lightning Lanes are not only easy to spot, they will list the price next to […]
The Truth About Travel Agent Planning Fees - Explore With Catherine
February 19, 2024 at 4:59 pm[…] to the questions that you’re asking. And we have systems in place to help you with things like My Disney Experience and […]
Disney Package vs Hunting For Deals - Which Is Better? - Explore With Catherine
May 30, 2024 at 12:06 pm[…] you understand My Disney Experience? You may have an email confirmation that you bought your tickets. But, do you know how to attach […]
How to Stay on Budget While Eating at Walt Disney World - Explore With Catherine
July 3, 2025 at 2:54 pm[…] posts the real menu prices for every restaurant on their website and in the My Disney Experience app. If you’re trying to stick to a food budget, guessing isn’t the way to […]
Do Travel Agents Actually Save You Money On Disney Vacations? - Explore With Catherine
May 19, 2026 at 1:21 pm[…] to Disney, excited to start their trip, only to find out they never linked their tickets to their My Disney Experience account. Without someone to remind you to do this (or do it for you), you’re left standing in […]
How To Choose Between Disney or Universal This Vacation - Explore With Catherine
June 8, 2026 at 6:11 pm[…] app, My Disney Experience, has many tools. Take the time to figure out where everything is and how it works. If you know how […]