
Yay! You booked your Walt Disney World vacation!
As exciting as it is to finally book your magical vacation, it often comes with a lot of questions. And oftentimes, the first question is, “Now what do I do?”
Of course, there’s still a lot to think about. Will you be making any Dining Reservations? Will you be purchasing Genie+? What attractions will be a “must do”?
But, this is not that kind of post.
While ADR’s and attractions are fun to plan, you’re not going to get to that point without doing these 6 steps first.

1. Create A Disney Account
If you booked your trip yourself, it’s safe to assume that you already have an account. But, if you booked with a Travel Agent and you don’t already have a My Disney Experience account, the first step is to create one.
My Disney Experience is located on the Walt Disney World website. But, even if you’ve never booked a Disney vacation before, it’s possible that they’ll tell you that your email is already in their system.
And that’s because Disney uses the same login for everything. Have a Disney+ account? Have you purchased anything from shopDisney? They all use the same login.
So, if you get that message, use that email and password and log into your My Disney Experience Account.

2. Link Your Reservation(s)
Your next step is to link your Disney Resort, ticket, or package reservations to your My Disney Experience account.
To do this, simply go to My Plans, under the My Disney Experience tab on the Walt Disney World website.
If you booked a Disney Package, meaning your Resort and Tickets were booked at the same time, your tickets will automatically link to your account as soon as you enter your Resort Reservation number. There’s no need to link them separately.
To link your Resort-only Reservation or your Disney Package to your account, look for Resort Hotel and enter your Reservation number under the link titled Link A Reservation.
For ticket only purchases, look for Park Tickets, and enter your Reservation number under Link Tickets.
You should be able to tell that your Resort and/or Tickets are successfully linked because the icon turns blue. But, you should still check your account to be sure everyone has the Tickets they should have.

3. Park Reservations
You’ll be allowed to book your Park Reservations as soon as you link your Park Tickets. We don’t know how long the Park Reservation System will last. But, they’re currently accepting Reservations through the beginning of 2024.
Park Reservations are REQUIRED to enter Disney Parks. Even with a Park Ticket, you will be turned away from the front gates without a Park Reservation.
Disney Tickets aren’t linked to any one Park. So, a dated Park Ticket tells Disney what day you’re going to the Parks. But, the Reservation tells Disney which Park you plan to visit.
If you don’t know what your plans are right away, that’s ok! But, the sooner you can make those Reservations, the better. Reservations do run out (especially Magic Kingdom and Hollywood Studios).
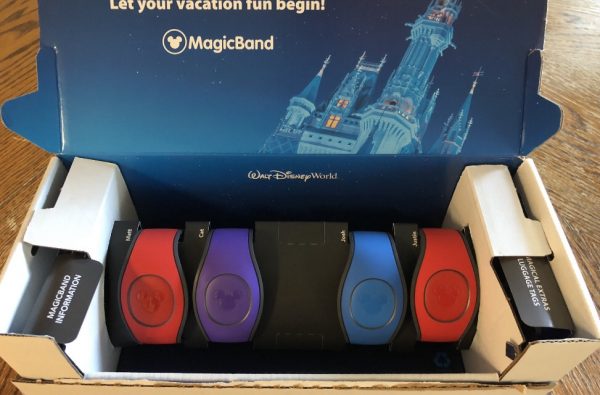
4. MagicBands
If you’re going to be using MagicBands in the Parks, the next step is to order them.
The best time to purchase your MagicBand is after you booked, and linked, your Disney Package. And that’s because you receive a discount for staying at a Walt Disney World Resort. This includes a $10 discount on the brand new MagicBand+. However, if you don’t like the options, you can purchase one at full price on shopDisney or in the Parks.
To order your discounted MagicBand, simply find My MagicBands and Cards, under the My Disney Experience tab.
You want to be sure you order at least 10 days prior to your arrival to Walt Disney World, in order to get them in the mail. Guests who purchase them late or live outside of the United States can pick up their MagicBands at the front desk as soon as you arrive to your Resort.
5. My Disney Experience App
The biggest piece of advice I tell my Clients is to download the app ahead of time. Anyone who has tried to use wifi at Walt Disney World will tell you it is painfully slow!
I also recommend looking through the app and familiarize yourself with its features and where to find them. Walt Disney World relies heavily on the My Disney Experience App. So, the more comfortable you are with where things are, the easier it will be once you’re there.
If you purchase Genie+, you’re going to want to know how to book your Lightning Lanes. Do you want to avoid a long line to get food or pay for merchandise? Know where those features are, so you can pull out your phone and quickly pay through the app.
Your Passport to FREE Travel Resources – Unlock Now!
Sign up to gain access to The Traveler’s Toolbox. Discover sample itineraries, expert tips, fun pages, and more.
Features you may want to familiarize yourself with are:
- Resort Details
- Wait times
- Disney Genie
- Virtual Queue
- Merchandise Mobile Checkout
- Quick Service Mobile Ordering
- Dining Reservations
- PhotoPass / Memory Maker
- Fun Features, like PhotoPass Lenses or Play Disney Parks
I know how frustrating it is to have to rely so much on an app. But, it does a lot of useful features. So, do a little bit of playing around and, trust me, your trip will be more successful because of it..
6. Consider Travel Insurance
If you need to cancel your trip, Disney will refund 100% of what you’ve paid, as long as you cancel 30+ days prior to your arrival. No questions asked. After that, you forfeit your $200 deposit. But, the rest will be refunded to you in the form of your original payment.
But, what about your flights, rental cars, etc? They are all subject to their own terms and conditions. So, even if you receive all of your money back from Disney, you may lose other travel expenses that you’ve paid for.
Purchasing Travel insurance is completely optional. But, it’s also one of those things you may wish you had when you actually need it.
Third Party Companies
Companies, like Travel Guard, Travelex, and Aardy, will reimburse you, based on the coverage you chose.
Prices and coverage vary based on many factors, like where you’re going, how many people you’re traveling with, etc. So, make sure the plan is right for you before purchasing.
Disney Travel Protection Plan
If you want to take the guesswork out of researching Insurance companies, Disney also has its own Travel Protection plan. It can be added to your Disney Package at any time. However, it must be added before paying your final payment.
The cost of your Travel Protection Plan must also be paid in full at the time of request. The cost for this Plan is currently $82.50 per adult and $6 per child.
Benefits include reimbursements for:
- Trip Cancellation / Trip Interruption
- Trip Delays
- Baggage Loss
- Bag Delay
- Emergency Medical Expense
- Emergency Evacuation
- Rental Car Damage
For further information on this policy, please read the Travel Benefits, underwritten by Arch Insurance Company.

Got questions? Feeling a bit anxious? Not sure where to begin? We help families, just like yours.
Planning an entire vacation can be overwhelming. But, here’s the good news: we have the answers to the questions that have been stopping you from pulling the plug on your next vacation.
We understand the journey, the ups, and the downs. We’ve been through the training, made our fair share of mistakes, and learned valuable lessons from them. This is what makes us the perfect people to assist you.
From thoughtfully crafted itineraries to having direct access to your dedicated Travel Professional, our mission is to remove the stress from your vacation planning. With our simple 3-step process, we’re here to help you every step of the way, ensuring that your dream destination becomes an unforgettable reality.
This post features affiliate links. When you make a purchase through these links, we may earn a modest commission. Rest assured, this does not result in any extra cost for you, and we do not gain access to your personal information. These commissions, though small, play a significant role in supporting our business. We genuinely appreciate your support—THANK YOU!


No Comments